August 2018 - Dog sitting, repairs and mods and back to Work
- Greg Szuhan
- Sep 24, 2018
- 10 min read
Updated: Nov 13, 2018
After 7 weeks on the road and having finished our outback adventure, we made our way home to Melbourne, giving us a chance to catch up on a few things including repair jobs as well as 3 weeks of some promised dog sitting.

We had always planned on being home for August and as expected, Shelby, a foxy and Delta, a miniature poodle arrived to stay with us taking the number of dogs in the house to five. With the house full of dogs, I called my previous employer and let them know I was home for a month and available to work if needed, starting work the next day. The extra cash would sure come in handy, particularly with the repairs and mods bill.
Anyway, being home, we emptied the van and everything came out and I mean everything. Every draw was emptied and cleaned, every cupboard vacuumed, even the mattress came out and the cover washed as we tried to remove as much of the red dust as possible. At the same time we emptied the car, determined to only put back what we actually used and needed. In total, Denise did about 8 loads of washing which included our dirty stuff as well as what we thought was clean but turns out was covered in a layer of dust anyway.
In addition to this, I had a list of things to fix, repair or modify before our next trip. Looking at the list with the "must do" repairs and the "like to do" modifications getting longer, it was time to start at the top and figure out where the red dust had been getting in.
DUST PROOFING THE VAN
Surprisingly red dust had got into just about every cupboard including the ones above the bed so the hunt was on to find out where it was getting in.


Across the front of the van where two pieces of fiberglass meet is a joiner and a quick inspection revealed that the sealant had dried and in places had come away from the top panel. This would allow dust and even water to get in behind. An easy fix with a quick clean and a new bead of sealant, however, this would have only let dust in the lower section of the van, not likely the overhead cupboards so the search continued.
The StarCraft has a cover over the front window which is hinged at the top. I am guessing that due to the corrugations, the screws on either end of the hinge had stripped and pulled free from the van exposing the screw holes. The screws would not pull up tight again so again with some sealant/adhesive under the hinge and some slightly larger diameter screws, the hinge pulled back down to van and hopefully fixed our dust problem in the front of the van.
Despite thinking I had previously sealed all the holes under the van, crawling under again at night with all the lights on and an extra spot light in the draws and cupboards proved that I had either missed quite a few or the new gaps had opened up during travel. Another tube of sealant and another hour under the van and this time I am confident the dust wont be coming in from around any hose or pipe.
WHEEL ALIGNMENT


The caravan was in desperate need a wheel alignment with one tyre out of the four wearing badly on the outside edge. Only the front tyre on the passenger side was scrubbing so it was off to the local truck tyre and alignment place near home for an hour or so and $200 later, the alignment was fixed. The tyre will need to be replaced but i'll try and get another couple of k's of it before I do.
LOOSE SCREWS
All the cupboards where all showing signs of rattling loose in some way or form. The 9mm screws used in 10mm chipboard or ply are really not up to the job for even a semi off road van but this is what they use on an Outback. Armed with a screwdriver, a tube of liquid nails and an assortment of different replacement screws, every screw in the van was checked, replaced or glued as well as extra screws added to each and every draw runner. All the cupboard door hinges were also checked, in fact, it's fair to say every nut, bolt and screw accessible inside and out was checked and tightened if required.
WATER PRESSURE
Water pressure from the rear tank had always been poor compared to the front water tank and while under the van I found that the clear water hose from the tank to the water pump had been installed wedged under a copper gas line and with a kink in it. As I needed to relocate the tank selector switch to install my new storage boxes, it was a perfect time to sort out the kink and move the hose from under the gas line. Pretty simple fix, disconnect the hose from the switch end, feed it back to the kink, reroute it back to the new switch position and reconnect. Done! No more difference between the front of rear tank water pressure inside the van.
INSTALL STORAGE BOXES
When you are out on the road you get the opportunity to see many great ideas on how other travellers have solved problems, modified their vans or improved functionality. Some are worth copying while other make you cringe and wonder why.


What I did see and like on another Jayco StarCraft in Charleville was a pair of under tray work boxes installed under the van in front of the axles. With the angled front giving at least an illusion of aerodynamics, they give enough extra space to store the wheel chokes, levelling blocks and a few other bits and pieces on one side and the water filter, connectors and water hoses in the other. Installation in our van was easy as there are cupboards above where the boxes sit and I was able to bolt straight through the floor as well as to the subframe underneath the van.
This freed up enough space in the tunnel boot to do another modification, Installing the Weber Baby Q on slides.
INSTALL WEBER SLIDE
The Weber Baby Q is a great BBQ but it's only downside for us was that it didn't fit in the tunnel boot with the lid on with only a couple centimetres making the difference between fitting in and being too tall. Removing the legs off the stand would have given me enough clearance but rather than cut or modify the original Weber BBQ stand, I decided to replace it and make my own.


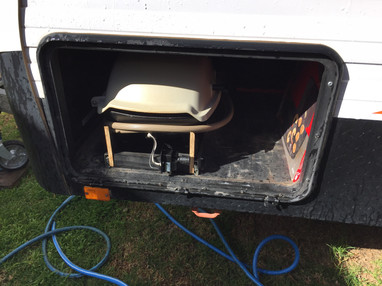

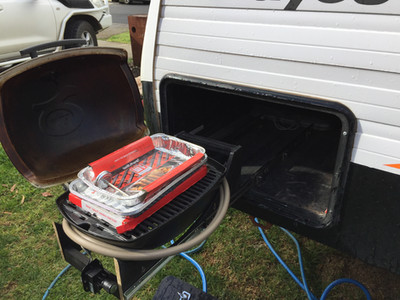
The Weber plastic frame is held together by four bolts so it is easy enough to dismantle. Using the plastic frame as a template I cut similar shaped frames from 12mm ply but without the legs which dropped the BBQ low enough to fit in the tunnel boot. After bolting the BBQ into the new frame and relocating the ignitor it was down to Bunnings to pick up a couple of drawer slides and some angle brackets. I decided on a pair of 700mm slides for a couple of reasons, they were long enough for the BBQ to clear the boot (after a second minor modification to shorten the new stand a little), they would take up less space valuable storage space in the boot, they were lighter then the heavy duty slides and they were less than $20 for the pair. Being a timber stand, it was easy to screw the slides to the stand and once bolted to the angle brackets, it was ready to screw into the tunnel boot and all for about $25 plus the ply which I already had. If needed, all the screws could be replaced with 4 or 5mm bolts at a later date but after 4000km on the road, everything is still holding together nicely.
EXTERNAL FOLD DOWN TABLE
My next project was to install an external fold down table.


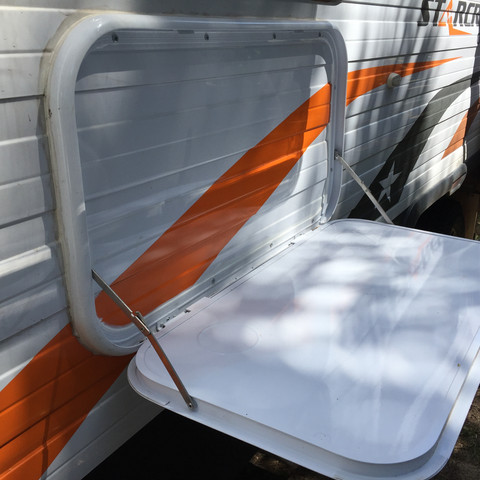
There is something very uncomfortable about drilling into the outside of the van. Following the instructions that came with the table, I marked out the holes, predrilling pilot holes and with plenty of adhesive sealant, the table was installed within 20 minutes. I think more time was taken choosing the right location (at least a 2 beer job) and checking to make sure it was clear of any wiring than it did to actually install the table.
INSTALL DIESEL HEATER
After a little research online and talking to a number of people during our winter journey, I decided to install a diesel heater on the off chance that the weather might still be cool inland (wrong, very wrong). Having bought a 5kw heater for $250 on eBay from an Aussie seller, it arrived in two days and with the weekend came time to install it.


If drilling holes to install the table with good English instructions had the anxiety levels up then cutting a hole in the floor with Chinglish instructions was ten times worse. The old saying of measure twice, cut once became measure 10 times drill a hole, measure some more and drill another hole and after about 10 minutes of inside measuring and outside measuring, inside again and under again, I finally worked up the nerve to cut a big hole in the floor.


Given our layout in the van, I decided the heater would be installed under one of the seats with the inlet vent in the bed area and the outlet under the table in the middle of the van. There was plenty of room between the wheel arch and drawer under the seat for the heater unit and enough clearance from the suspension underneath for the exhaust and combustion air intakes. To ensure there was sufficient airflow under the seat, I cut a hole in the partition wall in front of the air intake and used a brass vent purchased from Bunning to cover it. The Chinglish installation instructions left quite a lot to be desired but there is enough information on the interweb to be able to download some better instructions, including YouTube videos and the like. There is a very useful Facebook group you can join dedicated to supporting and installing Chinese Diesel heaters which has a files section containing everything you need know. Chinese Diesel vehicle air heaters - Troubleshooting & Parts sales. https://www.facebook.com/groups/146837062640024/

With the heater unit in, next issue was to figure out where the fuel tank would go and after checking my options, I decided that behind the spare wheel on the back of the van was the most practical. This required removing the rear bar on the van and fitting a couple of brackets but a pretty straight forward install. Finally, the 12v electric cable were run to the battery and fuel pump, the fuel pump and lines installed under the van and the exhaust and muffler installed (making sure they had sufficient clearance).
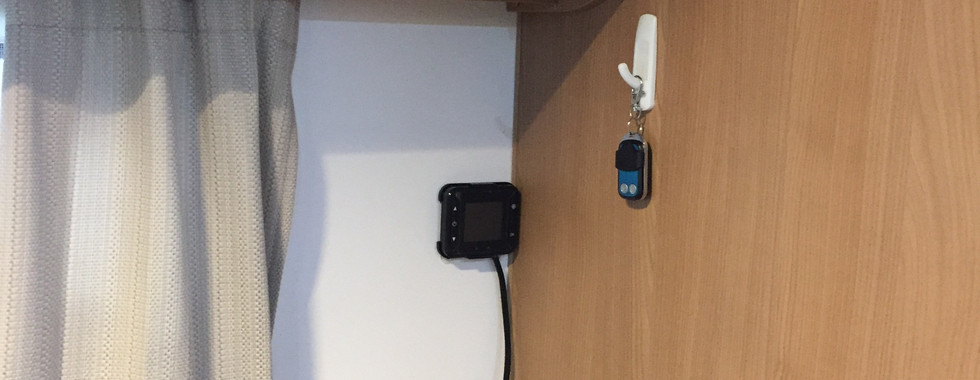
The controller was temporarily positioned inside the van and it was time to fire it up and test it out.
I must say, while it took some time to prime the pump and get fuel to the heater, it does work very well once its going with the only downside being the pulse fuel pump ticking sound which is louder inside the van than it is outside. I am guessing this might become a little annoying so I might need to see what can be done about that at some point. For now though, the heater is in, all done just in time for Summer!!
CLEARVIEW MIRRORS
One of the most annoying things about our last trip with Strap-on on mirrors was the having to reset the drivers mirror every time we passed an oncoming truck on the highway. Add to this, we lost the strap-on on passenger side mirror once when it just decided to fly off at about 90kmph into a roadside rest stop area. Luckily, we were able to make a U-turn and it had not smashed so we were able to refit it and continue on our way but at that point, the decision was made to replace the mirrors.

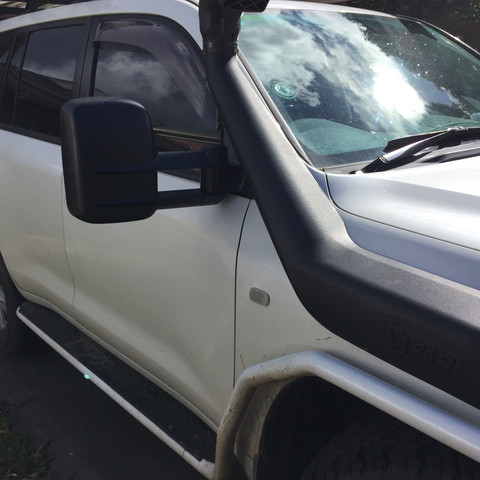

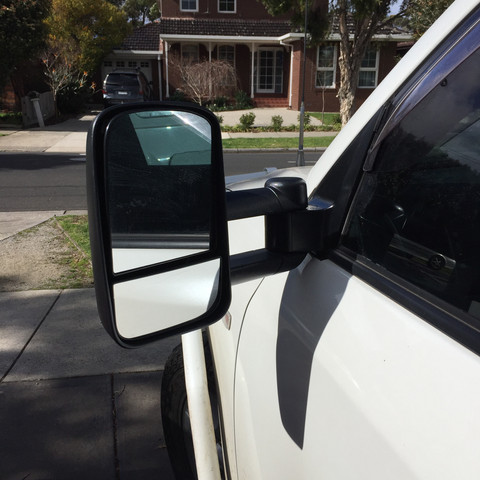
After doing the usual Interweb research on towing mirrors (what did we ever do before the interweb?) it was pretty clear that the best solution was to replace the factory mirrors with aftermarket towing mirrors.
After more interweb research, we decided that Clearview mirrors were ultimately the best value for money despite being over double the price of the cheaper Ebay options. They are just much sturdier, didn't have any of the reported vibration issues of the cheaper ones and came with a 3 year warranty. Installation was easy using the YouTube instructions, remove the door trim, remove the factory mirrors (3 bolts) install the Clearview mirrors (3 bolts) and refit the trim, the whole job, both sides done in just under an hour.
Initially, it took a little bit of getting used to the new mirrors but once on the road with the van behind, they really came in to their own. I do miss the factory options of tilt in reverse and the slightly convex passenger mirror but am getting used to using the split mirrors to pick up the blind spots. Best of all, passing oncoming road trains at 100kmph is n longer an issue and the mirrors stay where they should!
SULLAGE HOSE STORAGE
How annoying is winding up and storing the 25mm sullage hose? It's big, its bulky and it tends to take up valuable storage space.
While I was fitting the Diesel heater tank and had the rear bar removed, I found the perfect storage spot to store the sullage hose. It turns out that 40mm PVC storm water pipe fits nice and snug inside the hollow chassis rail and being just over 5.5 meters long (on our van), provides enough storage for my 10 meter hose (once cut in half to 5m lengths.)
Having been down to Bunning and purchased 2*6m lengths of 40mm pipe, I also purchased a 40mm to 50mm adaptor, a 50mm female threaded connecter, a 50mm male threaded connecter and a 50mm vent cap. Being 50mm at the end allowed enough diameter for my sullage hose fitting to sit neatly inside the vented cap.

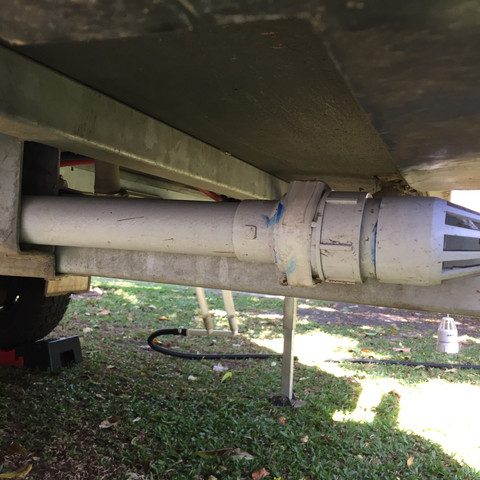

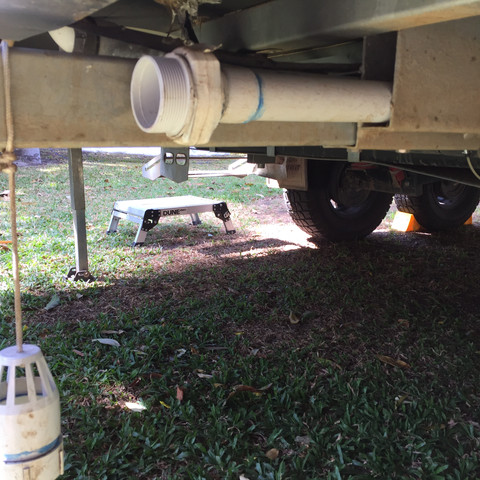
With the 40mm pipe pushed into the chassis rail and cut to length, the fittings glued together to make a vented screw cap, I need to tape a piece of garden hose between the rear bar and the fitting to allow enough room to twist the cap on and off and my new hose storage was complete. One tube in each side and a small piece of cord to secure the caps to the van when not screwed in place and no more winding up sullage hose. The added bonus is that in van parks where a sullage point in near by, I don't need to handle 10 meters of hose but with a simple rubber joiner (available from Bunnings), I still have 10 meters where i need it.
With all the jobs on the list ticked off, and August almost over, it was time to start thinking about packing for our East coast trip.

Brisbane Towing And Recovery offer affordable towing in Brisbane for cars, containers, and equipment — available 24/7! Whether it’s an emergency or scheduled pickup, count on us for cheap tow truck Brisbane services that are fast and reliable.Emergency recovery, Fast response,Budget-friendly rates.Call now for help or visit: https://brisbanetowingandrecovery.com.au/ .Your go-to for cheap tow truck in Brisbane, Australia!